2021.1.31 (월) +8days
Material Design
Material Design
Build beautiful, usable products faster. Material Design is an adaptable system—backed by open-source code—that helps teams build high quality digital experiences.
material.io
머터리얼 디자인은 플랫폼 및 기기 전반의 시각적 요소, 모션 및 상호작용 디자인을 위한 포괄적인 가이드이다.
구글이 2014년 안드로이드 스마트폰에 적용하면서 알려지기 시작한 디자인 시스템이다.
Material UI
MUI: The React component library you always wanted
MUI provides a simple, customizable, and accessible library of React components. Follow your own design system, or start with Material Design. You will develop React applications faster.
mui.com

Installation
npm install @mui/material @emotion/react @emotion/styledGlobals
MUI usage experience can be improved with a handful of important globals that you'll need to be aware of.
Responsive meta tag
MUI is developed mobile-first, a strategy in which we first write code for mobile devices, and then scale up components as necessary using CSS media queries. To ensure proper rendering and touch zooming for all devices, add the responsive viewport meta tag to your <head> element.
<meta name="viewport" content="initial-scale=1, width=device-width" />Customization
Theming
Customize MUI with your theme. You can change the colors, the typography and much more.
Theme provider
테마를 사용하려면 애플리케이션에 삽입하기 위해서 ThemeProvider 구성요소를 사용해야 한다. 하지만 이 것은 옵션사항이고 MUI 구성 요소는 기본 테마를 제공한다.

import * as React from 'react';
import Checkbox from '@mui/material/Checkbox';
import { createTheme, ThemeProvider, styled } from '@mui/material/styles';
import { orange } from '@mui/material/colors';

const CustomCheckbox = styled(Checkbox)(({ theme }) => ({
  color: theme.status.danger,
  '&.Mui-checked': {
    color: theme.status.danger,
  },
}));

const theme = createTheme({
  status: {
    danger: orange[500],
  },
});

export default function CustomStyles() {
  return (
    <ThemeProvider theme={theme}>
      <CustomCheckbox defaultChecked />
    </ThemeProvider>
  );
}
Component Example
Button
Basic button
The Button comes with three variants: text (default), contained, and outlined.

<Button variant="text">Text</Button>
<Button variant="contained">Contained</Button>
<Button variant="outlined">Outlined</Button>
Contained button

<Button variant="contained">Contained</Button>
<Button variant="contained" disabled>
  Disabled
</Button>
<Button variant="contained" href="#contained-buttons">
  Link
</Button>
Drawer
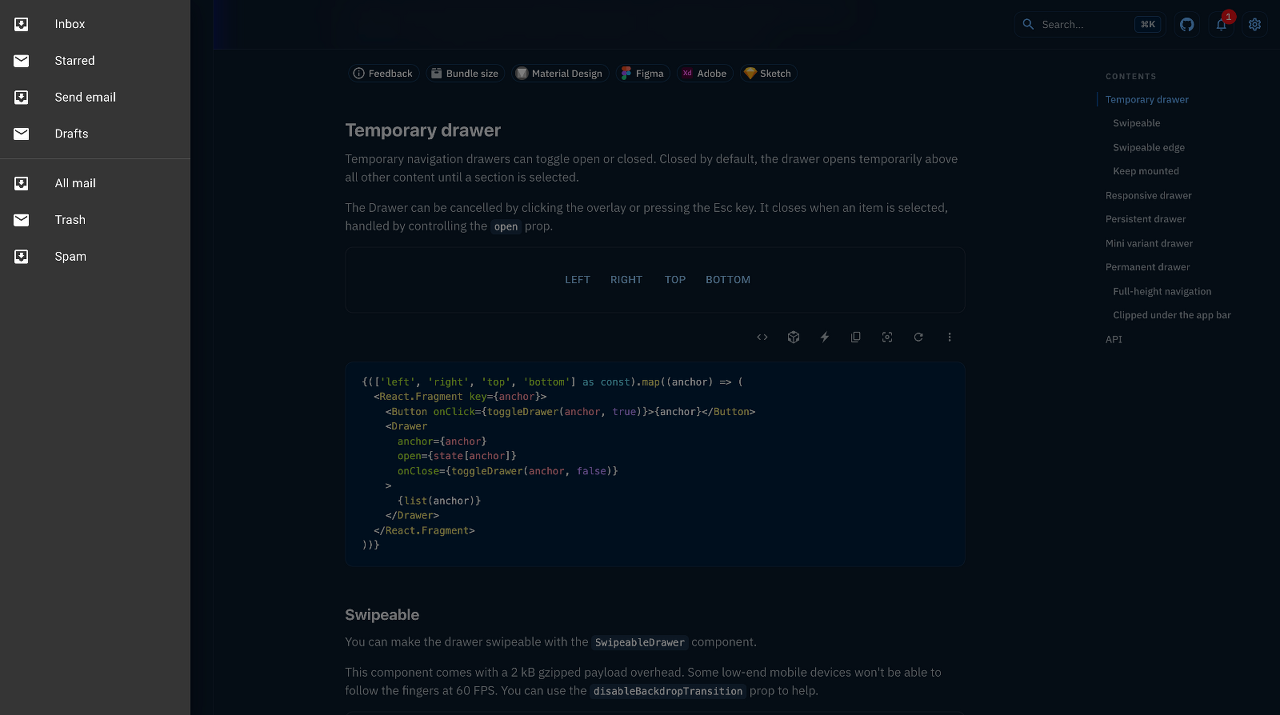
Temporary navigation drawers can toggle open or closed. Closed by default, the drawer opens temporarily above all other content until a section is selected.
The Drawer can be cancelled by clicking the overlay or pressing the Esc key. It closes when an item is selected, handled by controlling the open prop.

import * as React from 'react';
import Box from '@mui/material/Box';
import Drawer from '@mui/material/Drawer';
import Button from '@mui/material/Button';
import List from '@mui/material/List';
import Divider from '@mui/material/Divider';
import ListItem from '@mui/material/ListItem';
import ListItemIcon from '@mui/material/ListItemIcon';
import ListItemText from '@mui/material/ListItemText';
import InboxIcon from '@mui/icons-material/MoveToInbox';
import MailIcon from '@mui/icons-material/Mail';

export default function TemporaryDrawer() {
  const [state, setState] = React.useState({
    top: false,
    left: false,
    bottom: false,
    right: false,
  });

  const toggleDrawer = (anchor, open) => (event) => {
    if (event.type === 'keydown' && (event.key === 'Tab' || event.key === 'Shift')) {
      return;
    }

    setState({ ...state, [anchor]: open });
  };

  const list = (anchor) => (
    <Box
      sx={{ width: anchor === 'top' || anchor === 'bottom' ? 'auto' : 250 }}
      role="presentation"
      onClick={toggleDrawer(anchor, false)}
      onKeyDown={toggleDrawer(anchor, false)}
    >
      <List>
        {['Inbox', 'Starred', 'Send email', 'Drafts'].map((text, index) => (
          <ListItem button key={text}>
            <ListItemIcon>
              {index % 2 === 0 ? <InboxIcon /> : <MailIcon />}
            </ListItemIcon>
            <ListItemText primary={text} />
          </ListItem>
        ))}
      </List>
      <Divider />
      <List>
        {['All mail', 'Trash', 'Spam'].map((text, index) => (
          <ListItem button key={text}>
            <ListItemIcon>
              {index % 2 === 0 ? <InboxIcon /> : <MailIcon />}
            </ListItemIcon>
            <ListItemText primary={text} />
          </ListItem>
        ))}
      </List>
    </Box>
  );

  return (
    <div>
      {['left', 'right', 'top', 'bottom'].map((anchor) => (
        <React.Fragment key={anchor}>
          <Button onClick={toggleDrawer(anchor, true)}>{anchor}</Button>
          <Drawer
            anchor={anchor}
            open={state[anchor]}
            onClose={toggleDrawer(anchor, false)}
          >
            {list(anchor)}
          </Drawer>
        </React.Fragment>
      ))}
    </div>
  );
}
List
Virtualized List
In the following example, we demonstrate how to use react-window with the List component. It renders 200 rows and can easily handle more. Virtualization helps with performance issues.

import { ListItem, ListItemButton, ListItemText } from "@mui/material";
import React from "react";
import { FixedSizeList } from "react-window";

export default function VirtualizedListExample() {
  function renderRow(props) {
    const { index, style } = props;

    return (
      <ListItem style={style} key={index} component="div" disablePadding>
        <ListItemButton>
          <ListItemText primary={`Item ${index + 1}`} />
        </ListItemButton>
      </ListItem>
    );
  }

  return (
    <div>
      <FixedSizeList
        height={400}
        width={360}
        itemSize={46}
        itemCount={200}
        overscanCount={5}
      >
        {renderRow}
      </FixedSizeList>
    </div>
  );
}
- Material Design ⇒ 구글이 선도하고 있는 디자인 시스템
- 다양한 서포트 ⇒ Example Project / Design Tools
- FAQ ⇒ 실무 과정에서 마주할 이슈들 정리
- Layout / Theme ⇒ 체계화 된 시스템
- API 구성 ⇒ Components / API / Demo
- makeStyles ⇒ 컴포넌트의 구조를 관장
- Virtual List ⇒ Virtual Scroll
- System ⇒ 순수한 커스텀 컴포넌트 생성 가능


본 포스팅은 패스트캠퍼스 환급 챌린지 참여를 위해 작성되었습니다


댓글